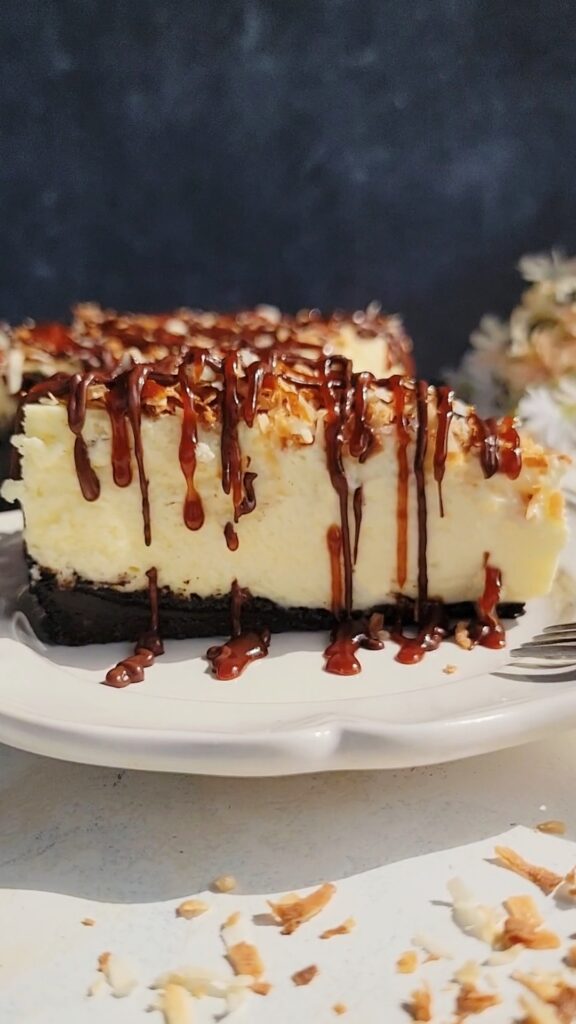
Samoa Cheesecake (Girl Scout Cookie Inspired)
This Samoa Cheesecake is inspired by the famous Girl Scout Samoa Cookies. The cheesecake begins with a chocolate cookie crust, which is topped with a velvety smooth vanilla cheesecake. The cheesecake is topped with toasted coconut, a drizzle of chocolate, and a drizzle of homemade buttery caramel. This cheesecake is the ultimate dessert and trust me, it won’t last long!
Ahh, it is that time of year when Girl Scout cookies are seen all over. And, if you are like me, you love Girl Scout Cookies! This Samoa Cheesecake is inspired by, of course, the Samoa Girl Scout Cookies, also called Caramel DeLites. I’m telling you, this may actually be my favorite cheesecake I’ve made. I mean, I love my blueberry crumble cheesecake, too. But this one. It’s really good.
Come springtime, you tend to see a lot more coconut baked goods, thanks to it’s light texture and sweet, tropical notes. This Samoa Cheesecake would make a great springtime dessert, Easter dessert, or addition to your mother’s day brunch. BUT, it’s so good, I would definitely recommend just adding it to your cheesecake rotation throughout the whole year :).
Here’s what you will love about this Samoa Cheesecake
- It tastes just like the Samoa Girl Scout cookies, but in cheesecake form
- It has a few different components but it’s easy to make. The Samoa cheesecake filing is a creamy vanilla cheesecake, which is straight forward and easy to mix together. The toppings (toasted coconut, chocolate drizzle and caramel drizzle) are easy to prepare. You can use either homemade or store bought caramel.
- You can prepare the toasted coconut and caramel a few days before making the Samoa cheesecake
Here’s how to make this Samoa Cheesecake
making the crust
The crust for this Samoa Cheesecake comes together in just a couple minutes. You’ll add the chocolate Oreo cookies, filling and all (you can use either chocolate stuffed Oreo cookies, or vanilla stuffed Oreo cookies) to a food processor and process until fine crumbs remain. Add in the melted butter and blend to combine.
Pour the crust into an 8-inch springform pan. Use the bottom of a glass to smooth the cookie crust along the bottom and sides of the pan. Bake in 350F oven for 8 minutes.
make the Samoa cheesecake filling
Now, it’s time to make the creamy cheesecake filling. If you want to ensure you achieve an ultra smooth and creamy cheesecake texture, I recommend adding just the cream cheese to your stand mixer, or large mixing bowl. Beat until smooth and creamy, scraping the bowl down several times in between. Add in the sugar and sour cream and beat on medium-low speed until smooth and creamy. Scrape down the bowl halfway through mixing to ensure even mixing.
Next, add in the heavy cream and vanilla. Mix just until combined.
Finally, you’ll add the eggs, one at a time and mix JUST until combined. When making cheesecake, you want to add the eggs one at a time and mix JUST until combined. At this point in making the cheesecake, you don’t want to overmix, as it can whip too much air into the cheesecake filling. Too much air can cause cracks in the surface once it bakes.
time to bake
Pour the creamy Samoa cheesecake filling over top of the cookie crust. Wrap the sides of the springform pan with aluminum foil, then place the cheesecake in a large roasting pan or a 12-inch circle cake pan. Pour hot water so that it is 2 inches up the sides of the pan, making sure that the water does not go over top of the aluminum foil covering. This hot water bath helps the cheesecake bake more evenly and helps prevent the cheesecake from cracking.
Bake in 325F oven for 50 minutes. You may be wondering how to tell when the cheesecake is done. The center should still be slightly jiggly (but should look set and not liquid-y), while the edges will be set and less jiggly.
Once the samoa cheesecake is done baking, turn oven off and crack oven door. Allow the cheesecake to cool for 1 hour. Once it has cooled in the oven for 1 hour, cover the cheesecake lightly with plastic wrap and refrigerate for 4 hours or overnight to allow the filling to fully set up and get that ultra creamy texture.
toast the coconut
When you are ready to serve, or even the day before you want to serve the Samoa cheesecake, toast the coconut. Preheat your oven to 350F. Once the oven is up to temperature, spread the coconut onto a sheet pan in an even layer. Toast the coconut for 4-5 minutes, stirring halfway through.
make the homemade caramel sauce
If you are running short on time, you can certainly use store-bought caramel for this Samoa cheesecake. However, if you have the time, I highly recommend making my homemade caramel sauce. It is buttery, and has all the delicious caramel-y notes that make this Samoa cheesecake oh so delicious.
You can even make the caramel sauce a few days in advance.
For this caramel sauce, there are two different ways you can make the caramel. I will explain below.
beginner caramel
To make this caramel sauce, you’ll add the granulated sugar to a small saucepan over medium low heat. If you are a beginner at making caramel, I recommend adding 2 tablespoons of water to the granulated sugar. This will produce what is called a wet caramel. The moisture from the water helps the sugar melt more evenly and helps to prevent the sugar from burning. This caramel is slightly lighter in color.
Swirl the pan, don’t stir, as the sugar melts and begins to turn a caramel color. Swirling the pan will help the sugar melt more evenly. Once the sugar has melted and the mixture is a golden caramel color, remove from the heat.
Be careful in this step as the mixture can splatter. Add in your butter and stir until melted.
Add the caramel back onto the stovetop over medium-low. While stirring, pour in the heavy cream, mixing just until mixture is combined. Stop stirring once the mixture is combined.
Allow the mixture to bubble for 1 minute, then remove from the heat. Pour into a 4 ounce mason jar, or glass jar.
advanced caramel
To make this caramel sauce, you’ll add the granulated sugar to a small saucepan over medium low heat. Without the added water, this will produce what is called a dry caramel. This caramel is richer and has a deeper, darker color.
Swirl the pan, don’t stir, as the sugar melts and begins to turn a caramel color. Swirling the pan will help the sugar melt more evenly. Once the sugar has melted and the mixture is a golden caramel color, remove from the heat.
Be careful in this step as the mixture can splatter. Add in your butter and stir until melted.
Add the caramel back onto the stovetop over medium-low. While stirring, pour in the heavy cream, mixing just until mixture is combined. Stop stirring once the mixture is combined.
Allow the mixture to bubble for 1 minute, then remove from the heat. Pour into a 4 ounce mason jar, or glass jar.
assemble
When ready to serve, sprinkle the toasted coconut over top of the cheesecake, then drizzle with melted chocolate and caramel.
Storage
Store leftover Samoa cheesecake wrapped in plastic wrap, or in an airtight container in the refrigerator for up to 5 days.
Frequently Asked Questions
- Can I use sweetened or unsweetened coconut? I recommend using sweetened coconut for this Samoa Cheesecake recipe.
- Can I toast the coconut a day or two in advance for this Samoa cheesecake? Yes! You certainly can. Just store the toasted coconut in an airtight container.
- Can I make the homemade caramel sauce in advance? Absolutely! This caramel sauce tastes just as good the first day as it does a few days later. The caramel sauce does thicken after storing in the refrigerator. You can simply microwave the caramel sauce for a few seconds to get to your desired consistency.
- How can I tell when the cheesecake is done? You should be able to see the cheesecake jiggle slightly in the middle. The edges will be set and not move, while the center should jiggle slightly. This Samoa cheesecake seemed to consistently finish baking right around 50 minutes for me.
- What if I don’t have a nonstick springform pan? Lightly spray your springform pan with nonstick cooking spray before baking.
- How do you get the cheesecake batter ultra smooth? It’s important that the cheesecake ingredients are room temperature, or softened. I like to beat the cream cheese by itself first, scraping the bowl down several times to make sure the cream cheese is fully beaten and softened before adding the other ingredients.
Here are a few of my favorite cheesecakes
Let me know what you thought!
If you make this Samoa Cheesecake, let me know what you thought in the ratings and comments below. I absolutely love reading all of your comments! Also, make sure to snap a picture and tag me @simplebakingwithpep on instagram. It truly makes my day to see all of your wonderful creations.
social
Make sure you follow me on facebook, youtube, or instagram to stay up to date on all of my latest baking creations and some fun behind the scenes
Print
Samoa Cheesecake
- Total Time: 6 hours 20 minutes
- Yield: 8-inch cheesecake 1x
Description
This Samoa Cheesecake is inspired by the famous Girl Scout Samoa Cookies. The cheesecake begins with a chocolate cookie crust, which is topped with a velvety smooth vanilla cheesecake. The cheesecake is topped with toasted coconut, a drizzle of chocolate, and a drizzle of homemade buttery caramel. This cheesecake is the ultimate dessert and trust me, it won’t last long!
Ingredients
Oreo Cookie Crust
- 22 Chocolate Oreo Cookies
- 6 tablespoons unsalted butter (3 ounces)
Filling
- 1 cup granulated sugar (200 grams)
- 24 ounces (3 8-ounce packages) cream cheese, room temperature
- 1/4 cup sour cream (61 grams)
- 2 teaspoons vanilla extract (8 grams)
- 1/4 cup heavy cream (60 mL)
- 3 large eggs
Toppings
Toasted Coconut
Caramel drizzle
- 1/3 cup granulated sugar
- 2 tablespoons water
- 2 tablespoons unsalted butter
- 1/4 cup heavy cream
Chocolate drizzle
- Semi-sweet chocolate
Instructions
1. Preheat oven to 350F.
2. In a food processor, add Oreo cookies. Grind the cookies until fine crumbs remain. Add in the melted butter and pulse until combined.
3. Add Oreo cookie crumb mixture to an 8-inch springform pan. Use the bottom of a glass to smooth out the Oreo cookie mixture along the bottom and sides of the pan. Bake in preheated oven 8 minutes. Remove from oven and set aside. Reduce oven temperature to 325F.
4. Make the cheesecake filling.
In the bowl of a stand mixer fitted with the paddle attachment, or using a handheld mixer, add softened cream cheese. Beat on medium speed until smooth and creamy, roughly 2-3 minutes, scraping down the bowl halfway through. Add in the sugar and sour cream. Beat until smooth and creamy, scraping down the bowl halfway through mixing. Add in the heavy cream and vanilla and beat just until combined. Scrape down bowl of mixer.
Add eggs, one at a time, and mix JUST until combined. Scrape down the bowl in between adding the eggs to ensure the batter is completely mixed together. You don’t want to overmix the batter at this point, as overmixing can create too much air in the batter and cause the cheesecake to crack when baked. You can alternatively mix the eggs in by hand, since it is a bit gentler.
7. Add the cheesecake batter to the cooled Oreo cookie crust.
8. Get the cheesecake ready to bake. Wrap the bottom and sides of the springform pan with aluminum foil. Place in a large roasting pan, or a 10-12-inch round pan and add boiling hot water to bottom of pan so that it is 2 inches up the sides of the springform pan. You want to make sure the water is not higher than the aluminum foil covering.
9. Bake the cheesecake. In the preheated 325F oven, add the cheesecake/roasting pan and bake for 50 minutes. The center should jiggle slightly and the edges should be set. Prop the oven door open and allow the cheesecake to sit in the warm oven for 1 hour to cool.
10. Allow the cheesecake to sit in fridge for 4 hours or overnight, covered, to chill and set-up.
11. Toast the coconut. You can do this when ready to serve the cheesecake, or a day or two before. Preheat the oven to 350F. Spread the coconut out in a single layer on a ¼ sheet pan. Bake in oven for 5 minutes, stirring halfway through. Allow to cool. If you made in advance, store in an airtight container at room temperature until ready to use.
12. Read this before making the caramel. You can make the caramel the day of serving, or a couple days in advance. You can make the caramel two different ways and both produce delicious results. There is a beginner caramel and an advanced caramel. The difference between these two caramels is the addition of water for the beginner caramel. It helps the sugar melt more evenly. If you make the advanced caramel without water, the result is a richer, darker caramel, but both are equally delicious.
Make the homemade caramel. In a small saucepan, over medium-low heat, add the granulated sugar. If you are new at making caramel, I recommend adding 2 tablespoons of water to the sugar. It helps the sugar melt more evenly.
Do not stir the caramel. Swirl the pan a few times to evenly melt the sugar.
Once the sugar begins to turn a caramel color, remove from the heat.
Be careful in this step as the caramel is hot and can splatter. Add your butter and stir until melted and combined.
Add the saucepan back over medium-low heat and while stirring, pour in the heavy cream. Stir until fully combined.
Allow the mixture to bubble and simmer, untouched for 1 minute, then remove from the heat.
Pour the caramel into a 4 ounce mason jar, or glass container. Store leftovers in the refrigerator.
The caramel will harden in the fridge. Microwave a few seconds to achieve your desired consistency.
13. Assemble. When ready to serve, top the cheesecake with the toasted coconut.
Melt semi-sweet chocolate in the microwave in 20 second increments, stirring in between each until fully melted. Place in piping bag, or zip-top bag with one corner snipped off, and drizzle over cheesecake.
Add caramel sauce to a piping bag or zip-top bag with one corner snipped off. Drizzle over cheesecake.
Serve and enjoy!
- Prep Time: 30
- Chill Time: 5 hours
- Cook Time: 50
- Category: Dessert
- Method: Oven
- Cuisine: American


This was an amazing recipe. My family loved it!
I am so glad you and your family loved this cheesecake, William! It’s one of my favorites, too 🙂
-Jolene