Brownie Cups
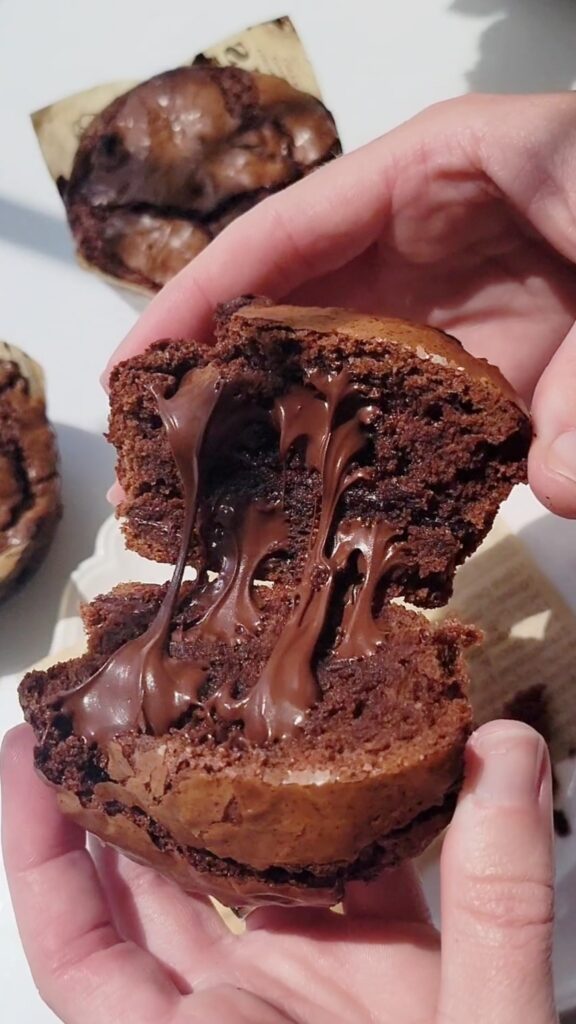
These Brownie Cups have shiny, crinkly tops with crisp edges and fudgy, chewy centers. The brownie cups are loaded with chocolate chips, so each bite is filled with warm, melty chocolate. These only take a few minutes to make and can be made as jumbo brownie cups or bite sized brownie cups. The key to the crinkly top is beating the eggs with the sugar until the mixture turns a pale yellow color, and triples in volume. This will leave you with a perfect crinkle top every time.
I am a sucker for a good, fudgy brownie, BUT I also like to have the crispy edges. There’s just something about the contrast in textures that is so good. So, yes, I am a corner piece type of brownie gal. That’s not to say I wouldn’t eat a center brownie, also, because they are equally good. I mean, really, who can refuse a brownie?
Anyway, these brownie cups are my ultimate brownie. They have the crisp edges and deliciously fudgy centers. These brownies use all melted semi-sweet chocolate which results in a fudgier brownie. I find that cocoa powder sometimes makes brownies dry.
To be honest, I had planned to use a mixture of both chocolate and cocoa powder, but had ran out of cocoa powder and forgot to restock it. So, I decided to try making them with just semi-sweet chocolate and I was sold. I loved the denser, fudgier texture the chocolate provided.
Here is what you will love about these Brownie Cups
- The ultimate brownie – these brownies have perfect, crackly tops, crisp edges, and fudgy, dense centers filled with melty chocolate. No more fighting over corner pieces : )
- You can make these brownie cups in jumbo size or regular sized muffin pans. You can even make in mini muffin pans.
- Customize these! You can add nuts into these, peanut butter chips, broken up pieces of Oreos, etc. Feel free to customize these if you want!
- Easy to make – these brownie cups are very easy to make and only take minutes to mix together. The hardest part is whipping the eggs with the sugar. I personally did this by hand with a mixing bowl and a whisk, and let me tell you, it was a workout! But this step is important to achieve the crinkly top.
Frequently Asked Questions
Making your own muffin liners/brownie cup liners
If you are making jumbo muffin liners, cut parchment paper into 6×6 inch squares. Place the parchment paper square in the muffin pan, then use a cup or glass to press the paper down into the muffin tin. It most likely will not stay put until you put the batter into it, which weighs it down.
If you are making regular sized muffin liners, cut parchment paper into 5×5 inch squares. Place the parchment paper square onto the bottom of a glass, then use your hands to press the parchment paper alongside the glass. This gives the liner its shape. You can also place the parchment paper square on top of the muffin tin and use a glass or cup to press the parchment paper down into the muffin liner, if you have a cup that fits into the muffin tin.
Baking Temperature
These brownie cups bake at a higher oven temperature, of 375F, rather than 350F. This results in a brownie that has a crisper edge and fudgier center. It also helps to create the cracked, crinkled top as the higher oven temperature causes the crust to set faster and crisp sooner.
If you prefer, you can bake at 350F, which will results in a softer edge. The centers should still be fudgy.
Chocolate vs. cocoa powder
These brownie cups use all semi-sweet chocolate which results in a fudgier, denser, richer, moister brownie. I find that cocoa powder sometimes dries brownies out. Typically I use a mixture of cocoa powder and semi-sweet chocolate, but wanted these to be ultra fudgy.
Let me know your thoughts!
If you make these Brownie Cups, let me know what you thought in the ratings and comments below. I always appreciate and enjoy reading your feedback. You can always take a picture of your creation and tag me on social media! I love seeing your bakes 🙂
Social
Make sure to follow me on my social media pages, to stay up to date on all of my latest creations! You can find me on instagram, youtube, facebook, or tiktok.
Print
Brownie Cups
- Total Time: 0 hours
- Yield: 6 jumbo brownie cups, or 12 regular sized muffin cups 1x
Description
These Brownie Cups have shiny, crinkly tops with crisp edges and fudgy, chewy centers. The brownie cups are loaded with chocolate chips, so each bite is filled with warm, melty chocolate. These only take a few minutes to make and can be made as jumbo brownie cups or bite sized brownie cups. The key to the crinkly top is beating the eggs with the sugar until the mixture turns a pale yellow color, and triples in volume. This will leave you with a perfect crinkle top every time.
Ingredients
- 8 tablespoons unsalted butter, melted
- 8 ounces semi-sweet chocolate, melted
- 3 large eggs
- 3/4 cup granulated sugar
- 3/4 cup all-purpose flour
- 1 teaspoon baking powder
- 1 cup semi-sweet chocolate chips
Instructions
1. Preheat oven to 375F. Line a jumbo muffin pan with 6 muffin liners, or a 12-count muffin pan with 12 muffin liners. Set aside until ready to use.
2. In a small saucepan, add butter and semi-sweet chocolate. You can use semi-sweet chocolate chips or a good quality semi-sweet chocolate bar. Over medium-low heat, stirring frequently, melt chocolate and butter. Remove from heat and allow to cool to room temperature.
3. In the bowl of a stand mixer fitted with the whip attachment, a large bowl, using a handheld mixer, or using a whisk, add sugar and the three eggs. Beat for 5 minutes until the mixture becomes a light pale yellow color, and triples in volume. This is key to getting the shiny, crackly top.
4. Switch the stand mixer attachment to the paddle and add in the melted chocolate mixture. Whisk to combine. Add in the sifted flour and baking powder, just until combined. Fold in the chocolate chips.
5. Scoop batter into prepared muffin tins. Bake in preheated oven for 20-26 minutes (jumbo size), or 14-18 minutes (regular sized). The top should be shiny and crackled in appearance, when done and the edges should be set. Also, insert a toothpick into the center of the brownie cups to check for doneness. The toothpick should have just a few moist crumbs on it when these are done.
6. Allow to fully cool in pan. Enjoy!
Notes
- Make your own muffin liners. If you are making jumbo brownie cups, cut parchment paper squares into 6×6 inch squares. For regular sized (in a standard 12-count muffin tin), cut parchment paper into 5×5 inch squares. Place the parchment paper on top of one of the muffin tin cavities and place a glass or cup on top of the parchment paper square. Press the glass/cup down onto the parchment paper into the cavity to create the muffin tin shape in the parchment paper. You can also place the parchment paper on the bottom of a glass, and press the parchment paper down along the sides of the glass. This will create the muffin tin shape. The liners will most likely stay put until the batter is added.
- Baking temperature – these brownie cups bake at a higher temperature of 375F, rather than the standard 350F. This helps create a crisper edge, and fudgier center. This higher temperature also helps create the crinkled top, since the edges set faster. You can also bake these at 350F which will create less crispy edges. The center will still be fudgy.
- Prep Time: 15
- Cook Time: 20-26 minutes
- Category: Dessert
- Method: Stove Top/Oven
- Cuisine: American

Can you use already made muffins cups or do you have to make your own?
Hi Brianna! You can totally use already made muffin cups! No need to make your own. 🙂 I hope you enjoy these!
-Jolene
Made these over the weekend for some family that was in town. They are fantastic!! Everyone raved about them.
I am so glad these were a hit, Michelle! Thanks for making them!
-Jolene