
Cinnamon Roll Croissants
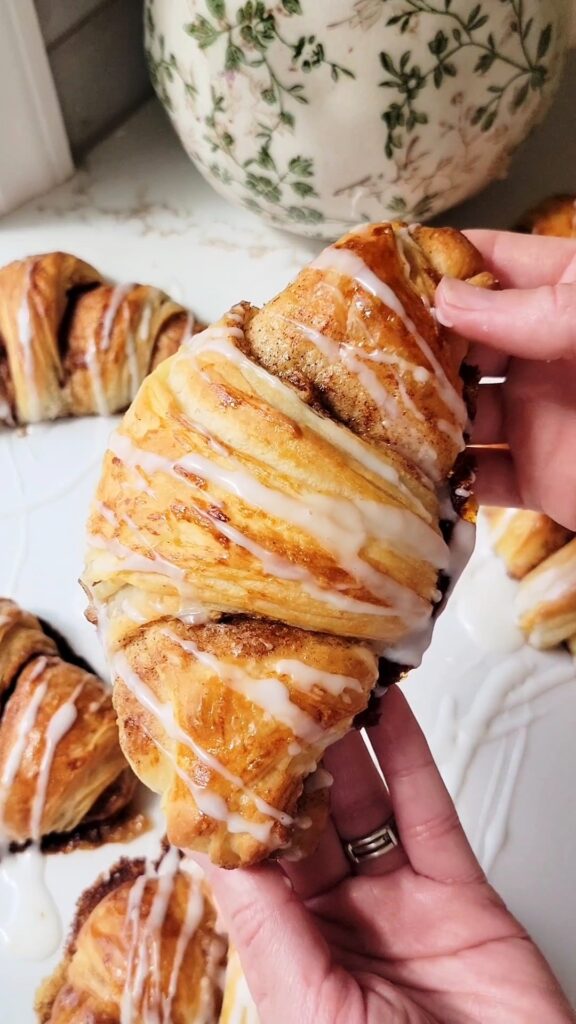
These cinnamon roll croissants have delicate, flaky, buttery layers and are filled with a delicious cinnamon sugar filling. The croissants are baked until golden brown, then topped with a vanilla icing. These croissants are made with an easier, shortcut method to traditional croissants, and can be made the same day. This method still yields a deliciously, flaky, layered croissant, but with less time. The majority of the work is hands off and is done by the bread, while it rises.
Here is what you will love about these cinnamon roll croissants
- delicate, flaky, tender layers – these croissants have everything you love about a croissant, the flaky, buttery layers, combined with the delicious cinnamon sugar filling of a cinnamon roll.
- Easy to make – okay, I know croissants and easy don’t normally go together, but this shortcut croissant method makes these croissants way easier to make. They still take some time, but can be completed the same day in roughly 5-6 hours. Most of the time is hands off, while the dough does it’s work and rises.
- Make these ahead – if you want to get started on making these the night before, you can shape the croissants then allow them to rise in the refrigerator overnight.
Can I make these the night before?
Yes, you absolutely can! You can make these the night before, shape them into a croissant shape, cover with plastic wrap, then place them in the refrigerator overnight. Remove the croissants from the fridge and allow to rise for 2-3 hours at room temperature (ideal temperature 75-80). The croissants should be visibly puffy and have a wobble when you shake the baking pan.
I like to place the croissants in the freezer for about 20 minutes before baking. This helps to solidify the butter so that it doesn’t leak much from the croissants.
Instant vs. Active Dry Yeast
These cinnamon roll croissants use instant yeast. This means that the yeast does not need an activation time. With that being said, I still like to allow the instant yeast to sit in the warm water and milk for a couple minutes. This step also helps to ensure the yeast is active before mixing in all of the ingredients. I have gotten a bad batch of yeast before and there is nothing worse than wasting all of your ingredients!
After a couple minutes, the yeast will look frothy on the surface and have a yeasty smell. This means it is active and ready to use. Again, allowing the instant yeast to sit a few minutes is not necessary, just a personal preference.
Active dry yeast, on the other hand, does need an activation time. It needs to sit in the warm water and milk mixture for 5-10 minutes until it is visibly frothy on the surface and has a yeasty smell. This means the yeast is active and ready to use.
If you only have active dry yeast on hand, you can substitute this as a one to one ratio for the instant yeast.
What is the best type of flour for croissants?
This recipe uses both bread flour and all-purpose flour. The all-purpose flour is crucial for giving the croissants that tender, flaky, delicate structure. However, I have found that adding in bread flour, helps the croissants maintain their structure much better. The blend of both flours helps to achieve the tender, delicate layers, while also achieving the croissant structure.
Common errors to achieve the perfect honeycomb croissant structure
To achieve a perfect honeycomb structure in a croissant is one of baking’s hardest tasks. It requires perfect lamination, perfect temperature control, and overall flawless baking. So, don’t be hard on yourself if you don’t achieve an exactly perfect honeycomb structure. The beauty of these croissants is that you will still achieve tender, flaky layers of croissants, and the profile of flavors in these is hands down one of my favorites.
Shaping Croissants
While it looks easy, and it is relatively easy, there is quite a bit of technique in rolling croissants. If you roll the croissant too tightly, the center may not have room to expand to achieve a honeycomb structure, leading to a denser center. The croissants need some room to expand as steam, the butter and the yeast all work to expand and push out the layers.
To shape these croissants, you’ll want to cut a 3/4 inch slit in the wide end of the base. Gently pull the cut pieces apart. This will allow you to curve the croissant ends after shaping. Now, grab one or both ends of the croissant and very gently elongate the dough by 2 inches. This helps create more layers in the croissant. Roll the croissant, starting at the wide end, all the way to the tip, applying even pressure the whole way. Place the croissant with the skinny tip facing down on the parchment paper, so that it does not unravel as it bakes.
Proofing Errors
This is a common mistake, and sometimes it takes time to know just when your croissants are ready. While a guide for how long it takes for them to be ready is very useful, it is most important to look at your own dough to determine when it is done proofing.
Jiggle test/Wobble test – the croissants will be visibly puffy and will jiggle, almost like jello, when you quickly move the baking pan back and forth. This wobble is what you are looking to achieve for perfectly proofed croissants.
Indent test – a good way I like to tell when my croissants are done proofing, is the indent test. Gently press your finger into the croissant. If the dough springs back slowly, and fills in halfway they are perfectly proofed and ready to go.
Croissants are underproofed if the indent springs back quickly. This means they need more time to rise.
Croissants are overproofed if the indent stays and does not spring back at all. This means the croissants have rose too long. If you notice your croissants are overproofed, stick them in the freezer for 20 minutes and bake them. This will help to slow the yeast activity and help to solidify the butter. While they won’t have a perfect honeycomb structure, they may still come out okay, and will most likely still taste delicious. If a dough is overproofed the gluten structure weakens, which causes the croissants to deflate in the oven.
Print
Cinnamon Roll Croissants
- Total Time: 0 hours
- Yield: 12 croissants 1x
Description
These cinnamon roll croissants are flaky, buttery, and filled with a delicious cinnamon sugar filling. The croissants are baked until golden brown, then topped with a vanilla icing. These croissants are made with an easier, shortcut method to traditional croissants, and can be made the same day. This method still yields a deliciously, flaky, layered croissant, but with less time. The majority of the work is hands off and is done by the bread, while it rises.
Ingredients
Dough
- 2 1/4 teaspoons instant yeast
- 3/4 cup water, warmed to 110F
- 1/4 cup milk, warmed to 110F
- 1/4 cup granulated sugar
- 2 1/4 cups bread flour
- 3/4 cup all-purpose flour
- 4 tablespoons unsalted butter, softened
- 1 teaspoon salt
Butter layer
- 12 tablespoons unsalted butter, softened
Cinnamon Sugar Layer
- 8 tablespoons unsalted butter, semi-melted
- 1 cup brown sugar
- 1 1/2 tablespoons ground cinnamon
Egg Wash (before baking)
- 1 egg, beaten
Icing
- 1 cup powdered sugar
- 2–3 tablespoons heavy cream or milk
Instructions
1. In the bowl of a stand mixer fitted with the paddle attachment, add yeast, warm water and milk, sugar, bread flour, all-purpose flour, softened butter and salt. Knead the mixture on medium-low speed for 5 minutes. Transfer the dough to a lightly greased bowl and cover the bowl with plastic wrap.
2. First Rise. Allow the dough to rise for 1 hour in a warm place.
3. Punch down the dough and turn out onto your countertop. Divide into 10 roughly equal pieces. Roll into a 10-inch circle, then spread softened butter over top of dough. Repeat with second piece of dough, then place on top of the first buttered dough circle. Repeat with remaining dough, but do not butter the top piece of dough.
4. Transfer dough stack on top of a piece of parchment paper. Cover with plastic wrap and place in the refrigerator for 1 ½ hours.
5. Shape into croissant. Remove the dough from the refrigerator and roll into a 20-inch circle.
Your second rise timer begins now, as you roll and shape the croissants. The second rise takes 2 hours.
Spread cinnamon sugar filling over 20-inch circle. Divide into 12 triangles, cutting the dough circle like a pizza. Grab one end or both ends of the triangle and very gently stretch each piece to 12 inches. This helps create more layers.
6. Roll into a croissant. Cut a 3/4 inch slit in the wide end of the triangle. Gently pull the cut edges away from one another. This will allow you to curve the ends of the croissant after rolling. Roll up the croissant, starting at the wide end, all the way to the skinny tip, applying even pressure so that the roll stays even.
Place on a parchment paper lined baking sheet, with the skinny tip facing down, tucked under the roll. This is to ensure the croissant doesn’t unravel when baking. Cover with plastic wrap.
7. Second Rise. Allow the croissants to rise for 2 hours in a 75-78 F environment. If it is below 75, between 70-75, you may need closer to 3-4 hours.
As mentioned above, the second rise time begins when you start to shape the croissants. The croissants should be visibly puffy and roughly doubled in size. They should also have a slight wobble when you shake the pan. You can also gently press the dough with your finger. The croissants are ready when the indent slowly fills in halfway. If the indent bounces back quickly, the croissants need more time to rise. If the indent does not spring back at all, they are over-proofed. Place the croissants in the freezer for 20 minutes right when they reach the wobbly, proofed stage.
8. Remove the croissants from the freezer and brush the croissants with egg wash, making sure to only brush the top of the dough, not the sides where the layers are. Bake in 400F oven for 4 minutes, then reduce temperature to 375F for 14-20 minutes. The croissants will be a nice golden brown color, and feel light and airy to pick up. The internal temperature should be 204 to 212F.
9. Make the icing. In a medium sized bowl, stir together the powdered sugar and heavy cream or milk. Drizzle the rolls with icing. Serve and enjoy!
- Prep Time: 40
- Rise Time: 3 1/2 hours
- Cook Time: 20
- Category: Breakfast/Brunch
- Method: Oven
- Cuisine: French, American
Hi, Jolene. Just wanted to bring something to your attention. Your recipe explanation is confusing. It appears we’re to spread the cinnamon roll filling over the stack of layers before even rolling it out. When in actuality, were supposed to roll out the stack into a 20+” ring and THEN spread the coming filling over the large round of dough and then cut it in into wedges to roll up. Now, while your video on Instagram does show it that way, the explanation is confusing and leads one to think that you’re putting the filling on before rolling out that stack. I just kept going back and forth and while I’m a baker and I know how to do these because I just made some them yesterday using another recipe, others who have not made them might find it confusing. Just wanted to let you know.
Thanks!
Laura,
Thank you so much for bringing that to my attention. I can totally understand how that may have been confusing. I’m so sorry about that! I changed the recipe instructions so that it is more clearly explained. Thank you again, I truly appreciate it! Also, I hope you enjoyed these 🙂
-Jolene
I love these! My second batch is in the freezer as I’m typing this. That said, my son wants to wrap the croissant dough around slices of apple. Sounds like a great idea with the flavor profile, but do you have any suggestions to incorporate his addition?
Hi Lyn! First of all, sooo happy you love these!! Secondly, it is so funny you say that because I was literally planning to make an apple version of these! I am afraid whole slices of apple may weigh down the croissants, or if you put a slice in the middle it may make the center be more moist, rather than flaky. I still think it would be good! You could certainly try it? Make sure the apple slice is thin so that it cooks fully and gets tender. Also, I would recommend patting the apple slice dry, to get rid of excess moisture.
I am going to experiment with a few different versions over the next few days. Perhaps if I get really ambitious, I will get a finalized version out this weekend or next week one day!
Hope all of that helps! 🙂
-Jolene
Made them, loved them, devoured them. I assembled them the night before and baked them in the morning for a back-to-school treat. Most bakers would not recommend doing so, as they can overproof that way, but it worked well for me. 10/10, will make again!
Lisa,
So wonderful to hear!! What a great back-to-school snack! And, I am very happy to hear that these worked well to proof overnight in the refrigerator. Thanks for giving me feedback on that! I may have to try that in the future! It does make it convenient to bake them the next morning.
I just made an apple version of these yesterday, and oh my goodness! I think I may love them even more! I plan to share the recipe on Saturday 🙂
Thanks so much for making these!
-Jolene