No Churn Ice Cream
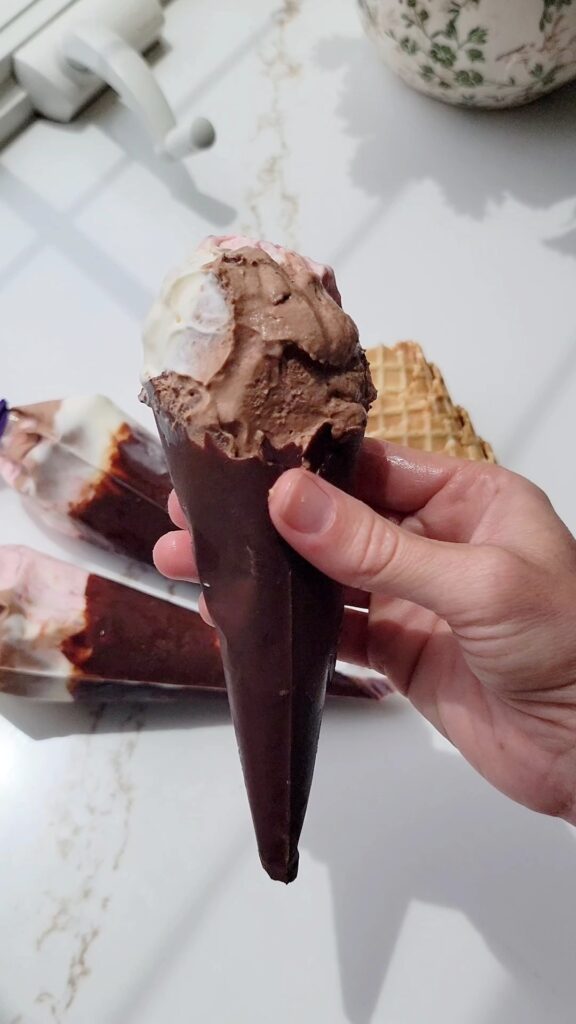
This no churn ice cream is creamy, indulgent and super easy to make. Make it as one flavor, or three, for the classic neapolitan flavor. You can serve this ice cream in a homemade chocolate cone for a fun way to enjoy this treat.
No Churn Ice Cream
- Total Time: 8 hours 25 minutes
- Yield: 6 cones 1x
Description
This no churn ice cream is creamy, indulgent and super easy to make. Make it as one flavor, or three, for the classic neapolitan flavor. You can serve this ice cream in a homemade chocolate cone for a fun way to enjoy this treat.
Ingredients
Ice Cream Base
- 14 ounces sweetened condensed milk
- 1/2 teaspoon vanilla extract
- 2 cups heavy cream, cold
Vanilla
- 1/3 ice cream base
- 1/2 teaspoon vanilla extract
Strawberry
- 1/3 ice cream base
- 1 cup fresh, or frozen strawberries, stems removed, rinsed, and quartered
- Juice of 1/2 lemon
- 3 tablespoons granulated sugar
- 1–2 drops red food gel (I used Super Red food gel from Chefmaster)
Chocolate
- 1/3 ice cream base
- 4 ounces semi-sweet chocolate, melted
Chocolate Cone
- 2 ounces semi-sweet chocolate per cone
- piping bags
- rubberbands
Instructions
1. Make the strawberry sauce. In a medium size saucepan, add the strawberries, sugar and juice of lemon. Cook over medium high heat, stirring frequently, until the sugar dissolves and the strawberries release their natural juices. Add in the red food gel (optional, but without it the color of the ice cream will be a more dull pink color)
Remove from heat, and using an immersion blender or blender (if using a blender wait 5-10 minutes to allow mixture to cool), blend until mostly smooth. I left a few pieces of strawberry, as I preferred that, but if you want it to be entirely smooth, you can blend until completely smooth.
Pour into a heatproof bowl.
Allow to cool in refrigerator until ready to use.
2. Make the ice cream base. In the bowl of a stand mixer using the whisk attachment, or using a large mixing bowl and handheld mixer, beat the heavy cream until stiff peaks form. Add in the sweetened condensed milk and vanilla extract. Beat just until combined.
3. Divide the mixture into three separate bowls, into three roughly equal portions.
4. Make the strawberry. Add the cooled strawberry sauce to one mixture and fold to combine.
5. Make the chocolate. Add cooled, melted chocolate to another bowl and fold to combine.
6. For the vanilla mixture, add ½ teaspoon vanilla extract and fold to combine.
7. Make the chocolate cone. Fill a plastic cup with warm water in the temperature range of 110-115F.
In a plastic piping bag, add 2 ounces semi-sweet chocolate inside the piping bag. Place the bag in the warm water. After a few minutes, the chocolate mixture should be melted.
Remove the bag from the warm water and press the chocolate as high as you desire for your chocolate cone.
8. Assemble. Place all three ice cream flavors into a piping bag.
Pull the chocolate cone piping bag apart and place the bag inside of a glass with the top portion folded over the top of the glass. The chocolate cone piping bag should now be opened with a cavity in the center to place the ice cream. There should be enough room at the top for extra ice cream to fit above the chocolate cone mixture.
Pipe the ice cream directly into the center of the chocolate cone piping bag, alternating the chocolate, vanilla and strawberry flavors, piping the ice cream above the chocolate cone.
Remove the bag from the glass and fold the edges up and over the ice cream, securing the top with a rubberband.
Place in the freezer for 8 hours, or overnight (ideal).
9. To serve, remove the rubberband, then pull the plastic bag down off of the ice cream and cone. You may need to lay the cone onto a plate to be able to push/pull the plastic off the ice cream and cone.
Because chocolate can melt easily, I like to place the chocolate cone into a waffle cone to serve.
- Prep Time: 25 minutes
- Freeze Time: 8 hours
- Category: Dessert
- Method: Freezer
- Cuisine: American